Friday, November 29, 2013

Hello Everyone.

Today, the design aspect of the project has reached completion. One major hiccup required a re-design. The initial concept and final projects are both great. If we had the ability to use more materials, we could have done the first design mentioned in previous posts.

But here are the events in order of occurrence:

After designs were reviewed, a selection was chosen. After a few modifications, the project looked great. The materials we will be cutting are translucent so the objects properties were modified through Solid-works. This was similar to an assignment and a pre-lab we were given earlier this semester.


The Lego Pontoons are purchased and are coming from Canada. Can't wait to see them. I am a little disappointed that I couldn't get measurements for the connections so we may just have to find another way to attach the pontoons with the 2-D cut top...

From here, we had to apply the steering mechanism. Lego parts were selected as the bast option. SO the designing began. After deciding a sleeve would be the best option, a design was submitted for the sleeve. Although the sleeve was designed adequately, it is not used. Notice the overall length of boat has been modified. It became apparent that the materials required were too much. And growing.


So a re-design was in order. All the lessons and back door techniques i had used to create the first boat made this process much easier and much less time consuming. Therefore, I actually had a great amount of fun really getting this as close as I could to material and time dedication restrictions given today's date. So I created the hull first. I created a flat shape for each side so all could easily be cut out by the 2-D cut process. I also did the same thing for the cap to the hull, the connector pieces and the Lego pontoon caps. 


The Steering system was much easier to put together given I had created a key chart of measurements for the Lego parts as a reference. I also created the rudders using a form from a Lego piece. And there were less moving parts to create added resistance and make it harder for the boat to turn while it is moving through the water. 

And the final product looks amazing in my opinion. There will be some angular cuts to be done once the 2-D cuts are completed, but that shouldn't be too hard. A team member has stated to have tremendous talents with plastic welding so it will be his task to connect all the pieces together so that it resembles the photo that follows.


As requested, the 2-D cuts require a certain type of drawing from the top so I created a document to enable them to initiate the project. The next images showcase the drawing from a top view perspective and the 3-D view of what the parts will look like as if all waste material was removed. 


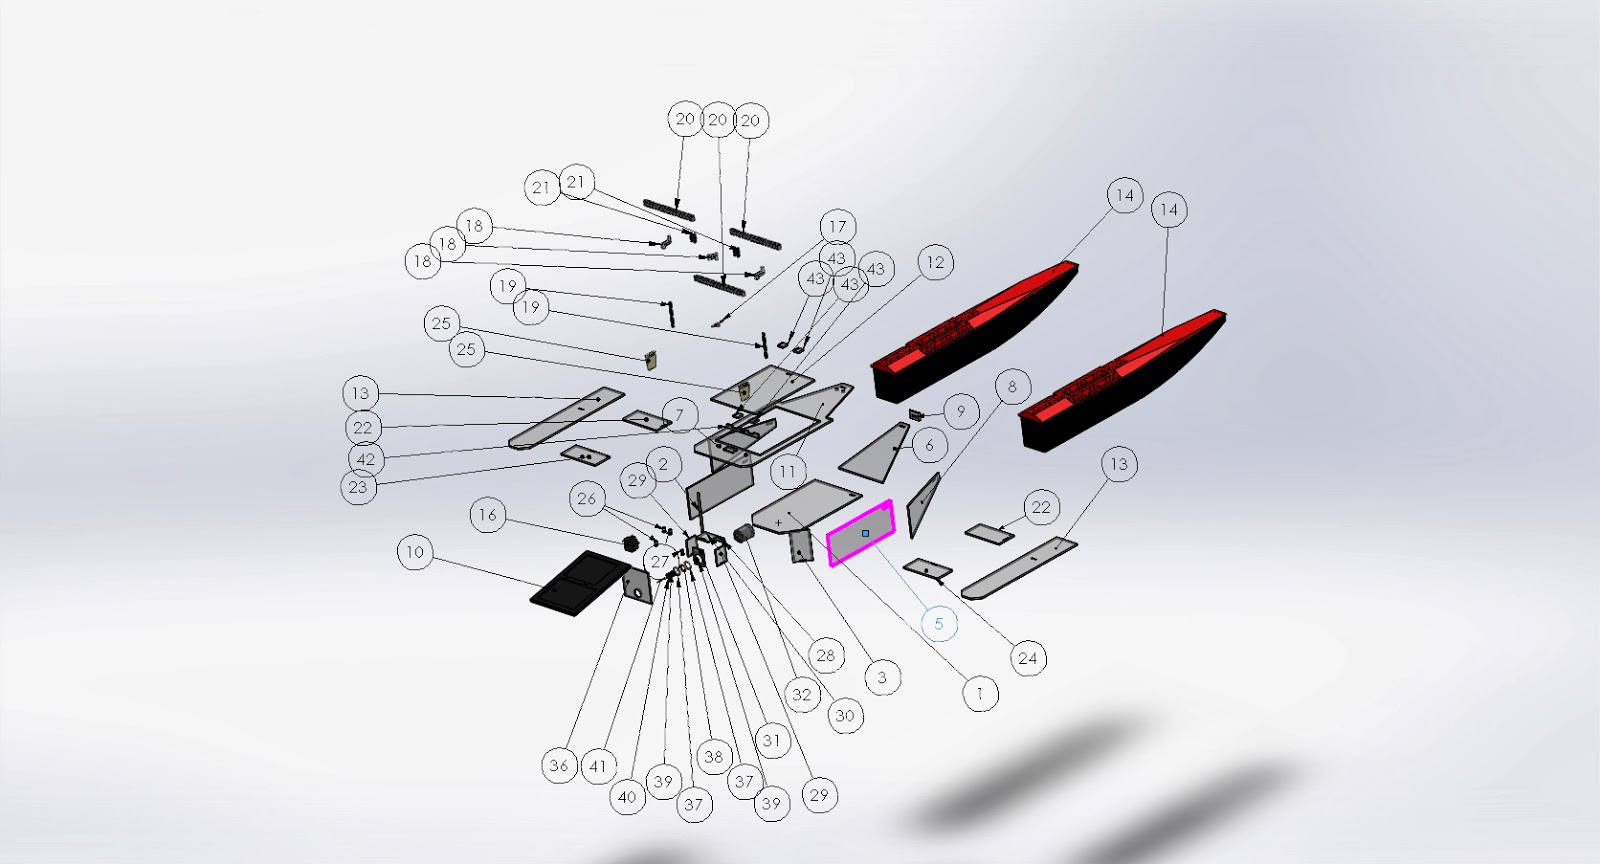
The next images are exploded views with 'Bill of Materials' lists added. 


I want to mention the last photo. The motor assembly. The thought of the concept was to create a long enough sleeve over the shaft so a connection can be made between the motor in our spark fun kits and the propeller for a toy boat. At the same time, the long shaft would act to increase stability of drive shaft itself. A rubber ring 15 mm in diameter will be held in pace by a 3-D printed shell as part of the project. The connection from the sleeve to the final axle will also be printed. And the final item to be printed will be the rudders. All items maintained under 4 cubic inches of material. 


All pieces that require angle cuts will be submitted in the next post. 

Best regards,

 Bobby Fisher

Saturday, November 23, 2013

Coding Patterns (Ideas)


I believe boat moving patterns can be achieved through mere functions and a coded control of delay and servo-motor (for rudder) values. For example, we would customly create different methods ("void Xpattern(), void Ypattern(), etc.") that can be called through the iPhone GUI interface. Within each method, all that needs to be altered with are the direction which we set the Servo as well as how long we want it in that position (delay). 

For a first example, let's take a mere circular pattern:


For this pattern our function would only set the Servo postion to one constant value (say 30 degrees). Our delay value, in this case, would determine only how long the boat would stay in a circular pattern. Experimentation can perfect these values so we can have it leave the circular pattern in any direction desired.

Another neat pattern would be an infinity loop:
 
Each color denotes a different stage that would be required to code into the method. Still, this quite simple. The red and blue phases only require a set amount of time for the delay whilst the green and brown portions require both a servo and delay value. Experiementation with a circular pattern will help us learn to be able to make more complex motions such as this.

Finally, we can take things to be even more complex and try to implement something such as this:
For this I imagine the easiest way to achieve this is to find out if the RC can be done in reverse while we change the Servo motor value. I think we discussed this was either impossible or incredibly hard, but I do have another idea. If we were to create an additional method to call within this specific pattern method thats purpose is to rotate the boat in place. But again, this would probably require two motors which I don't think is possible.


I will post some experimental code snippets on here when I figure out how to use Github....
-Mike
Implements Boat Lights:
In lecture, it was brought up that implementing lights using a delay has the potential to mess up other parts of the code when causing their execution to delay aswell. He mentioned how something else could be purchased to fix this but I think maybe another arduino board can fix it. All that needs to be done is an extremely simple code that can be uploaded on the board and stay in it. It would be an entire seperate entity that just needs batteries to power - however our hull would need room for the board.
Just a thought,
- Mike


Thursday, November 14, 2013

Here is the Motor created in solid works

Hello all, Here is the solid works model of the motor.


Here is the link to the file on a google drive.

https://drive.google.com/file/d/0B5kTxe-rj4kzeHZtUVdUcUdJNzA/edit?usp=sharing


Best regards everyone,

Bobby Fisher

Wednesday, November 13, 2013

My designs and models for download

Hey everyone,

Here are my designs:

I started first with the arduino case that would go inside the hull.


 My first design started from the concept of a sting ray:


My second design went in another direction, but it helped to really spur some great creativity that lead to the final product.


The final concept:


With incorporation of the lego pontoon:


And we get this:


I think it looks awesome. But I would love your feedback. 

If you take a look at the back of the holder for the arduino, there is an additional plane. That hole is directed downward at a 30 degree angle from the horizontal x axis. We can use this to mount the motor. The future designs will include pretty much everything. 

Post your thoughts. 

Mike's Design


My design incorporates the standard idea of two pontoons with a hull that extends the entire distance between the pontoons; all of which are covered and connected by the 1/8" acrylic sheet cut out. The acrylic sheet has an opening over the hull so that the arduino board can be easily accessed for modifications.

The motor for the drive system is attached under the acrylic sheet, just outside of the hull. A single gear can be utilized and supported via securing it to the acrylic/hull at multiple spots. Like the motor, the rudder system using the servo motor runs wires above the surface of the boat.

Simple Sketch:


Solidworks Model:

Tuesday, November 12, 2013

Overview of today's meeting, 11/12/2013

Okay,

After today's meeting, it's been decided that a pontoon boat will be our project.

Image and link for the pontoon have been included.

https://drive.google.com/file/d/0B_VSyj8G9gx1NzQwVTVyTjA1ZWs/edit?usp=sharing


Here is the image:


Today's Meeting:

Today, it was our plan to come to the meeting each with our own individual concepts. 

William brought in a great idea regarding a working pump system. His concept was to take two tanks, a pressure sensor, and an arduino system to control the amount of water in the holding tank. A user would be able to input a level of water and it would set to that level. A user could take some water out and the pump and the system would refill what was removed. 

Mike came in with his idea where a stepper system would track and relocate towards or away from light. This system would utilize the light sensor, a stepper motor, the arduino system, and some solidworks designed parts. His concept utilized a circular center with the 4 sensors extending at every quarter point. 

The final idea utilized the lego pontoon system shown above. The idea was to create a working toy boat system. This project requires a 2D cut out which could be used as the connection between two pontoons and a uniquely designed hull  that would house the arduino system, the stepper motor to regulate steering, the motor for the drive system, an LCD screen that displays current battery level and possibly other information, a working light system on the front and back as in standard boating systems, and will be connected via bluetooth control system and connected to an iphone and hopefully android system as well. 

The drive system was discussed extensively. A gear-driven drive system was mentioned. A horizontally directed drive line was discussed. Final conclusion was the latter. 

As discussed, by this Saturday 11/16/2013, our designs will be posted for the connected systems. All comments are appreciated. 

The final decision will be made on 11/19/2013 regarding which design will be used in the final project. The coding arrangements will be decided upon more at that meeting. 

(https://www.sparkfun.com/tutorials/152 - This is the link to the iphone control walk through. It does work. I was just playing with it.)

Till next time, be well. 

Monday, November 11, 2013

Second Idea from Bobby Fisher


So, I believe a really great idea would be to incorporate some of the material we have done by building a three pontoon iphone controlled boat. Below is a link to the pontoons on ebay, which I am designing in solid works as we speak. I feel this system could include the servo motor as the steering agent, the motor as the motor, and we could design the linkages needed to support the turning system and the housing for the motor and arduino board. I believe we could use foam of some sort to create the center pontoon system that houses all the electronics, the battery, the lighting systems, as well as the screen to inform of battery level and what not....
 
We could connect the outside pontoons with the plexi glass 2d cut out. I think we could really stay simple or create coding to follow some type of drive pattern that can be selected on the iphone....
 
I have been doing some reading on codeacademy.com to look into iphone coding as well as codes already out on the market that we could tap into. The stuff I also found is in the second link...
 
 
http://www.ebay.com/itm/Two-Lego-Boat-Pontoons-Floats-Parts-50820-50821-from-set-7244-1-Speedboat-/181255526790?pt=Building_Toys_US&hash=item2a33abd986


https://www.sparkfun.com/tutorials/152

Wednesday, November 6, 2013

The first Steps

The story begins now for Mike Igoe, William Cooper, and Bobby Fisher.

As discussed in lab, we will be defining three projects individually to bring to our first group meeting so we can choose what we will be doing for our project.

This process will take us to Nov 12, 2013.

We should put our links and ideas in one spot before reaching our meeting time. This will allow us to take a look and put some thought into feasibility to be discussed in the meeting.

If we want to define a rubric to determine feasibility, we can.

Please follow this blog with your regular email so as everyone makes changes, we are notified.

Thanks guys.

Best regards,

Bobby Fisher